Fedora Media Writer Breaks USB Drive?

The Musing

I recently created a Fedora boot-able USB drive with Fedora Media Writer to install it on a computer. It worked great! Except that I couldn’t get Windows to recognize the USB drive, even if I use the FMW to reset the drive to drive to factory settings.

It appears it might be an issue with how the drive is set as boot-able. Even knowing that, I couldn’t fix it. I tried fdisk/gparted/windows disk utility and probably a few others.

The Fix

What I found that fixed it was the Rufus utility. The Rufus utility is also used to create boot-able install media, but you can choose to create a non-bootable disk, and this is what option I used to make Windows recognize my disk again.

Repair Misbehaving Software RAID 5 Array

The Musing

Not really a musing, as much as I wanted to document this fix, because it seems to happen with alarming frequency.

The Situation

I run a Mythbuntu box to as a PVR – it works great! I recently created a software RAID array using mdadm with three disks. Sometimes when the power goes off and the machine doesn’t shutdown cleanly, it won’t boot, and I have to scurry around the interwebs to try and figure out how to repair the degraded array. This may not work for you, but it works in my case. Most of the time.

The Fix

Typically, I will repeatedly press Esc on boot to get the grub boot screen, and boot into a recovery kernel. This usually fails into an intramfs prompt complaining that the RAID array can’t assemble.

Going from this post, I force it to assemble using

# mdadm -A -s --force

The offending device is typically /dev/md1, which is made up of sda2, sdb2, and sdc2. /dev/md0 hasn’t given me that much trouble, but it’s made up of sda1, sdb1, sdc1.

Update 10/2020: The most recent error I received was that /dev/md1 showed that “found some drive for an array that is already active”. I used:

# mdadm --stop /dev/md1
# mdadm -A -s --force
# mdadm --start /dev/md1
# reboot


Apache Reverse Proxy for Moodle on CentOS 7.3

The Musing

As I’ve written previously, we moved our Moodle server to a virtual server, but I also keep live backups of each term for as long as possible. Because we’ve been using Moodle for almost ten (10) years, we have mountains of data, and it won’t all fit on the virtual machine. I’d still like to keep it live, not just on backup disk/dvd/whatever.

The Situation

I still have the previously used physical server that ran Moodle. It has tons of storage available, and still runs well, but it’s no longer under warranty which is one reason we moved our production Moodle instance to a VM. I want the physical machine to host the files/DB for all of the old Moodle installs, but so all of the URLs remain the same, use the VM as a frontend and reverse proxy (both http and https) to serve content from the physical machine.

The Fix

Essentially, I have to modify the VirtualHost entries for both http (80) and https (443).

<Location /2017Summer> 
ProxyPass http://moodleoldIP/2017Summer 
ProxyPassReverse http://moodleoldIP/2017Summer 
ProxyPreserveHost On 
Require all granted 
</Location>

and in ssl.conf:

SSLProxyEngine On
<Location /2017Summer>
ProxyPass https://moodleoldIP/2017Summer
ProxyPassReverse https://moodleoldIP/2017Summer
ProxyPreserveHost On
Require all granted
</Location>

Now, do a systemctl reload httpd and everything seems to work!

Mahara + Moodle = Mahoodle – Updating them between terms

The Musing

So at MHU we use Moodle extensively, and have been piloting a test install of Mahara for some English faculty that really want to use ePortfolios.

I set Mahara to integrate with Moodle, so that with a single (or more?) click, one can export their work to their Mahara portfolio.

Because of the strange way we do terms in Moodle (each new term is a new Moodle instance with a different URL), the public key was invalid (it’s encoded with the base URL) each time we changed terms.

The Fix

To fix this, simply go into Moodle (Networking / Settings) and delete and regenerate the public key. This will create a new key encoded with the new, base URL. Copy this key and login to Mahara as admin, and visit Administration / Institutions and edit the settings for your institution. Specifically, change the URL and update the public key under the XML-RPC authentication settings.

CentOS 7 and ClamAV

The Musing

We use Moodle at Mars Hill – at least three (3) different instances. One for our main LMS, one for TimeTracker, and one for myMHU, our campus intranet.

This past weekend, I braved the frozen tundra of our server room to upgrade the OS on our campus intranet server to CentOS 7. Seriously, I needed a parka. At least it’s better than the days of our servers overheating and shutting down, due to inadequate cooling systems included in the plan for that room, but I digress.

After getting everything up and running, I got an error notification that ClamAV was failing to run properly. I had set it up and verified the paths in Moodle, but for some reason it was failing every time someone tried to upload a file.

The Fix

After lots of Googling, I figured I better document how I fixed this problem so that if (when?) I run into it again, I won’t be stumped.

I found a great guide posted by WebHep – Diego something or other – on the Moodle forum. Unfortunately, I had done (most) of that already, and was still getting this error

ERROR: Could not lookup : Servname not supported for ai_socktype

when I tried to run clamdscan from the command line.

clamdscan error

It turns out, I found the solution posted deep in a clamd mailing list. The directory where the socket lives needed different permissions, so a simple

chmod 755 /var/run/clamd.scan/

(seems to have ) fixed everything.

Now, I just need to remember that I blogged about this issue when I upgrade the next server.


The 1k Cycling Milestone

The Musing

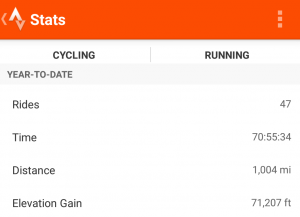
So yesterday, I went on a 23 mile ride with a colleague at work, and that put me over 1k miles for the year! Now, I realize that number is not much for many people, but I’ve never been even close before. I think last year I rode 650+, and the year before was probably even less.

Coach K won his 1,000th game this past year – he and I are kind of alike now, I guess.

With those 1k miles comes 71k feet of climbing. I wonder if those people that ride 5k-15k miles/year encounter an average of 70ft/mile of climb? Probably. Where do they get the time? Who knows! I know I’ll never average that much – due to sheer lack of free time – but I hope to keep going this year, even when in years past I’ve bowed out due to the cold. Maybe I’ll even get 1500 miles. Maybe not. Maybe next year. Either way, I’m proud of this achievement.

Using xbindkeys for Trackball Button Awesomeness

The Musing

About a year or two ago, I began using a trackball – I said I would never use a trackball, but whatever. Specifically, I began using the Logitech M570. It took a while to get used to it, but after the initial break-in period, I’m pretty good with it.

I use synergy (I donate – you should, too) to manage multiple computers from my M570 and Microsoft Natural Keyboard 4000 (I’ve been hooked on the curved keyboard for a decade and a half, now), but I never utilized the extra buttons on the M570.

To minimize jumping back and forth from the keyboard to the trackball, I went on a mission to both distract myself from work, and also conquer this most important problem.

After some quick Googling about how to map mouse buttons in Fedora 21, I came across a few sites like this one and this one. It looked like it was possible using xte from xautomation, xev from xorg-x11-utils, and xbindkeys.

I used dnf to install those packages, then I used xev to find out the IDs of my trackball buttons (mine were 8 and 9). I decided to map those buttons to the Home and End keys, but when coupled with the Ctrl key, they would act like Ctrl-Page Up and Ctrl-Page Down.

Why those keys?

I chose Home and End, because the trackball wheel conquers Page Up/Down pretty well in a browser or terminal window, but sometimes I want to go to the top/bottom of a long page quickly; Home/End send like a logical choice.

I use Ctrl-Page Up/Down to switch tabs in gnome-terminal and Firefox, so having that ability without switching my right hand to the keyboard seemed to make sense.

The Fix

First, I installed the necessary packages on Fedora with

sudo dnf -y install xbindkeys xautomation

I generated the defaults .xbindkeysrc file with

xbindkeys --defaults > $HOME/.xbindkeysrc

then commented out all of those lines and added this:


# Page Down
"xte 'keydown Home' 'keyup Home'"
b:9

# Page Up
"xte 'keydown End' 'keyup End'"
b:8

# Toggle tabs left
"xte 'keydown Page_Up' 'keyup Page_Up'"
control + b:9

# Toggle tabs right
"xte 'keydown Page_Down' 'keyup Page_Down'"
control + b:8

I started xbindkeys and it worked! Not the first time of course, but when does that ever happen? I had to tweak a bit to get the above additions to .xbindkeysrc.

Then I wanted to make sure that xbindkeys started on boot – that was harder than I imagined. I used the gnome-tweak-tool to add the application to startup, after adding a xbindkeys.desktop file to ~/.config/autostart/. It looks like:

[Desktop Entry]
Name=xbindkeys
GenericName=xbindkeys
Comment=Start these up at login
Exec=/usr/bin/xbindkeys
Terminal=False
Type=Application
X-GNOME-Autostart-enabled=true

And that was it! Not a big task, but – if I can train myself to use them – could prove to be a time saver and increase my productivity. Of course, not spending an hour or so implementing this fix might’ve improved my productivity, too!